
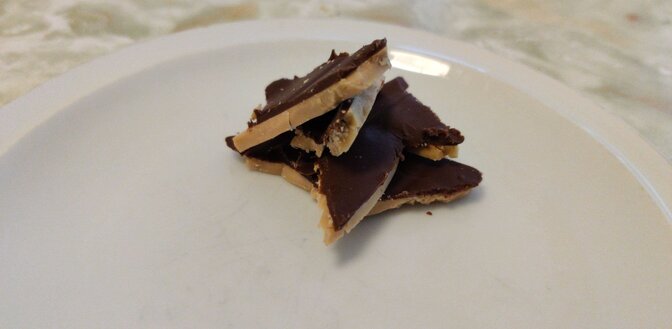
My latest foray into the cooking world has been chocolate buttercrunch, or what some people call English Toffee (apparently, mistakenly) (here’s my archive).
For several years, I have had an on and off exposure to what within the family we have been calling “crunch” after my brother started patronizing a local candy shop not far from his home. The favourite treat he bought from the store was chocolate buttercrunch. My mother and I loved it, and of course my brother did as well.
Said “crunch” was difficult to resist; it got to the point that my brother would simply place orders with his “candy lady” to purchase the “crunch” in bulk, amounting no doubt to several pounds at a time. The boxes in which he received the “crunch” were generic cardboard packing boxes about the size of a couple of large textbooks. Curiously, sometimes his orders took a week or two to fill, “because it will be a week or two before I make it again.”
Over time, I quietly shared my suspicion with my brother that his “candy lady” may have simply been ordering the candy from a well known Canadian brand of high end chocolates, since at a mall location of said brand of chocolates, they were selling the same kind of candy in squares which visually appeared to be identical to those from my brother’s “candy lady”, and they certainly seemed to taste the same. I also recall seeing a clerk replenishing the supply in the display case from a generic cardboard box, which seemed to be very similar to the boxes that my brother had been getting from his “candy lady”. No matter, both were entirely scrumptious.
But alas, several years ago, my brother’s “candy lady” closed her shop and moved away, and I rarely patronize the mall locations of the well known Canadian brand of high end chocolates in order to maintain a supply of the candy.
In June, 2020, I began making the “crunch” at home, rather successfully, for the most part – although it is now, albeit but a few weeks later, beyond my recollection as to why I specifically chose to attempt to make it. To my surprise, it is remarkably easy, albeit still requiring plenty of patience, and at least some basic skill – even when it largely goes according to plan.
I first found a recipe (here’s my archive) and which is the basis for my recipe, although I have modified some of the key steps, such as:
a) although I use butter as the principal fat source as called for in the recipe, I use margarine to grease the heavy pot, simply because I have a lot of margarine on hand given that a number of other baking recipes in my collection of recipes call for margarine (or can use either margarine or butter interchangeably, and we’re generally a margarine family. 🙂 )
b) I use maple syrup instead of corn syrup, since I live in a maple-syrup producing area, and it is commonly available; and,
c) I do not add nuts (a common ingredient in most “crunch” recipes), on the advice of my brother who (after relating a family story offering context) suggested that I “make what *I* like”, since I have not been fond of nuts, certainly in whole form, since I was a very young child.
(see later on for other modifications I brought to the recipe.)
I then purchased a food thermometer, a food scale (incidentally addressing a “problem” I have been “dealing with” for a few years now every time I try a recipe typically from Europe, typically from Jamie Oliver), some milk chocolate bars, and some butter; I already had a good supply of granulated sugar at home.
The first time I made the candy, I was surprised at how long it took for the buttercrunch part to rise to the 300F point, reminding me of a school chemistry experiment in which (as I recall) alcohol and water solutions would boil first at the lower boiling temperature of the alcohol, before rising to the boiling point of water.
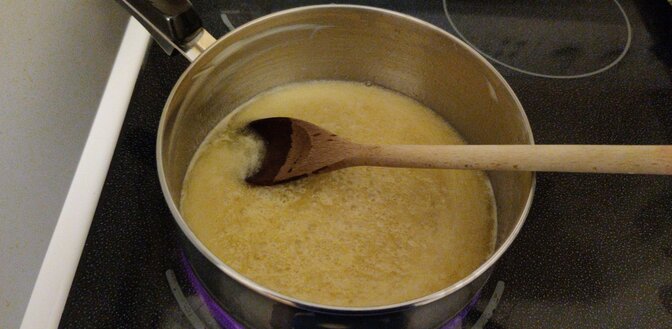
Once brought to the correct temperature, I poured the (at this point liquid) buttercrunch in my baking pan, which temporarily warped due to temperature differences. This led to parts of the buttercrunch which were thicker than others, to the point of some parts being “too thick”.
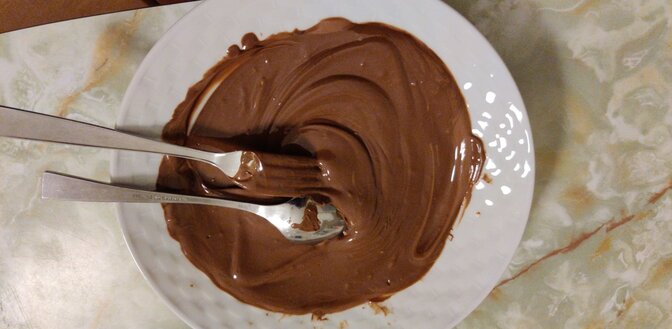
Chocolate was melted in two parts, a portion for each side, with cooling in between each attempt. However, I had difficulty in setting the second layer of chocolate, which easily became detached from the buttercrunch once cooled, and especially when I broke the large flats into pieces.
A separate problem with the chocolate was that I found that the milk chocolate bars I was using were on the one hand ideal for melting and pouring evenly (once melted) over the buttercrunch, yet on the other hand seemed to melt a bit too easily for my liking in the final product.
My brother and my mother both tried the “crunch” I’d made, and immediately took a great liking to it. My brother, whom I believe was being mildly gracious beyond otherwise liking what I’d made, asked about how hard it must have been to make the candy as good as the commercial offerings to which we were accustomed.
The time it took to cook the buttercrunch part had taught me to answer that it was principally a matter of patience while cooking the buttecrunch part as it took its time to rise to the correct temperature of 300F, and that beyond that, the success appeared to be largely due to a simple and successful recipe that I had consulted.
My next attempt experimented with separate parts of the recipe:
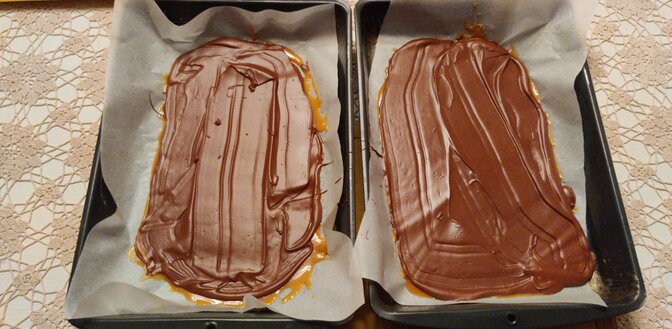
a) spreading the amount of “crunch” called for in the recipe over two baking pans instead of one, in order to make it less thick; and,

b) only attempting to coat one side of the candy with chocolate, instead of both;
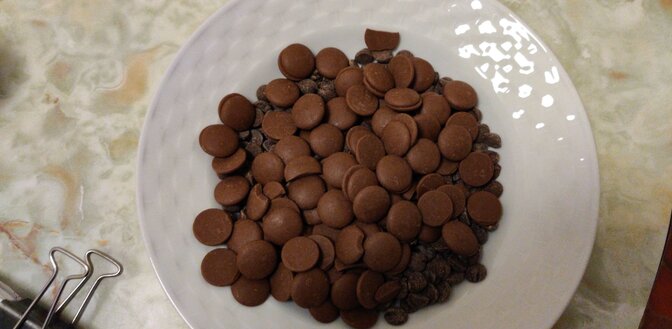
c) using semi-sweet chocolate chips as the chocolate source, principally because its price was more consistently at the lowest price point of bulk chocolate at my local grocery store.
The first two items were largely a matter of technique, while the choice of chocolate to use was initially a matter of cost. This incidentally addressed my concerns with the melting point of the chocolate, since its melting point also appeared to be a little higher than a number of the milk chocolate bars I was buying, as evidenced by the semi-sweet chocolate chips appearing to take longer to melt in my hands while handling.
Reviews from my brother and my mother indicated that using the semi-sweet chocolate chips was as good as the first batch, but that there was a slight preference for the milk chocolate coating, and that I had largely succeeded at making the candy less thick.
Given the success of the experiment with semi-sweet chocolate chips and the feedback I’d received, I decided to make a 50/50 blend of the semi-sweet chocolate chips and milk chocolate (be they buttons, chocolate bars, or otherwise), hoping to bridge the slight preference for milk chocolate with the apparent slightly higher resistance to melting in one’s hand of the semi-sweet chocolate chips.
This incidentally also lead to an opportunity during my upcoming summer holidays at the cottage to use up various collections of milk chocolate buttons which had been accumulating over a couple of years at the cottage – which is unheated over the winter when I am not there, hence presumably slowing any effect of time on its quality.
During my summer holidays at the cottage, I made three batches of the recipe, with uneven results.
The first batch turned out acceptably, however, I noticed that the butter began to separate from the buttercrunch near the end of the cooking phase when I had reached 300F, and, that it seemed to take longer to reach the temperature than at home in the city. I also found that it was harder to manage the cooking of the buttercrunch part, due to the heat from the stove rising against my hand holding the thermometer and the pot, making it very hot and dangerous. The stove at the cottage uses traditional electrical coil elements instead of the radiant heat elements to which I’m accustomed at home in the city; the heavy pot I was using at the cottage was a large heavy aluminum pot with a different handle configuration as compared to the somewhat smaller stainless steel pot I used in the city.
Nonetheless, the results of the first batch were sufficiently satisfactory that I was confident to give samples to a couple of neighbours.
The second batch proved more difficult, and underlined two problems I encountered during the first cottage batch, viz. that it seemed to take longer for the buttercrunch to rise to the desired temperature, and the butter seeming to separate. I assumed that this was possibly because the pot at the cottage had a larger surface area, affecting the heating of the buttercrunch part, due to greater heat losses to the ambient air being somewhat higher than in the pot I used at home. I also remembered at this point that I knew that the main burner on that stove heated unevenly.
During this same second batch, the chocolate mixture melted with a bit of difficulty due to the microwave oven being a model of half the capacity power wise to the unit I use at home in the city, affecting how it melted the chocolate and at what rate. A hot spot formed in the mix that burned, but which ultimately mixed in well to the rest of the chocolate without apparent ill effect.
The result from this second batch was what I consider a failure, since the buttercrunch part did not turn crunchy, but rather retained a firm fudge like consistency. As a candy, it was fine and very tasty; however, as buttercrunch, it was a failure.
A few days later, I decided to repeat my experiment, using a smaller pot, hoping that the relatively smaller surface area of the pot would address the heating issue. Unfortunately, the firm fudge-like consistency was repeated, and I again failed to get the crunchy part I was hoping for. I also had some difficulty in with uneven melting of the chocolate, which only affected the spreading of the chocolate, leaving a particularly bumpy surface in the finished product.
My last experiment at the cottage was to have involved the use of a portable countertop induction stove with the pot I use in the city (having asked that these objects be brought to the cottage by my mother who came to the cottage at the end of my holidays.) Unfortunately, the pot was not of the variety of stainless steel that works with induction stoves, stopping the experiment in its tracks.
I did not attempt to make any more “cruch”at the cottage, having a fair amount of the “failed” results on hand, and being confident that I could not, at least in the short term, resolve the issues at hand.
Back at home in the city after my holidays, I decided to make the “crunch” again with the equipment with which I’m familiar at home, albeit with a bit of trepidation, given my failures at the cottage.
It was, both unsurprisingly and as well as surprisingly, a complete success: The buttercrunch reached proper temperature, butter did not seem to be separating from the buttercrunch part, and I got the desired end product. My mother immediately asked for some samples, and gobbled up the results with great pleasure.
In the process, it seems that my suspicion that the difficulty with the batches made at the cottage laying with the uneven heating of the stove’s main element had been confirmed.
I have also begun to wonder, given that I have had such relative great success from the beginning – barring the difficulties at the cottage – that my brother’s “candy lady” may indeed have learned how to make her own chocolate buttercrunch, and she may indeed have learned to cut consistently-sized squares, which appeared to be similar to those of the well known Canadian brand of high end chocolates. Presumably, packing boxes are readily available similar sizes, and coincidentally, each purchased similar sizes. And, presumably, when she said that she was planning to make the “crunch” only after a certain delay, she was indeed doing so because she had other production priorities at hand when my brother was placing orders of relatively large quantities of her product.
Either way, I seem to have learned how to largely replicate the taste and texture, and dare I say the essence, of the “crunch”, to the pleasure of the family’s various sweet teeth.
Update 20200831: I used my portable countertop induction stove and a cast iron pot I own to make the buttercrunch part, and a double boiler to melt the chocolate. No surprise, it worked. So now all I have to do is try making the crunch at the cottage.
Update 20200911: I again brought the countertop induction stove, as well as the cast iron pot, to the cottage in order to replicate the experiment. I also used the double boiler method to melt the chocolate. My brother proclaimed the results as my “best batch yet”. When my brother and I left, our mom greedily kept most of the batch after giving my brother one of four bags of the candy, rationalizing that she was to be at the cottage for a few more weeks, while my brother might benefit from a hypothetical “next batch” that I might make. I kept quiet over my disappointment that to me, the “crunch” part seemed to be somewhere between the desired, crunchy result and the somewhat soft, granular fudge that I had made during my summer vacation. This leads to a new conclusion that had previously been going through my mind, that ambient humidity affects candy making, too. (Here’s my archive) Obviously, home in the city is a bit more climate controlled with central air conditioning, while at the cottage, the humidity is whatever it is, including when it’s stiflingly hot and/or humid.